How to Use the Drupal Media Library: Step‑by‑Step Guide
-

- by Mcs July 2, 2025
Fortunately, Drupal offers a powerful and flexible Media Library module that allows site builders and editors to reuse and manage media assets easily.
What is the Media Library Module in Drupal?
The Media Library module in Drupal provides a user-friendly interface for managing reusable media items like images, videos, audio files, and documents. It's built on top of the Media module and offers a visual browser/editor experience for content editors.
It was introduced in Drupal 8.6 as an experimental module and became stable in Drupal 8.8.
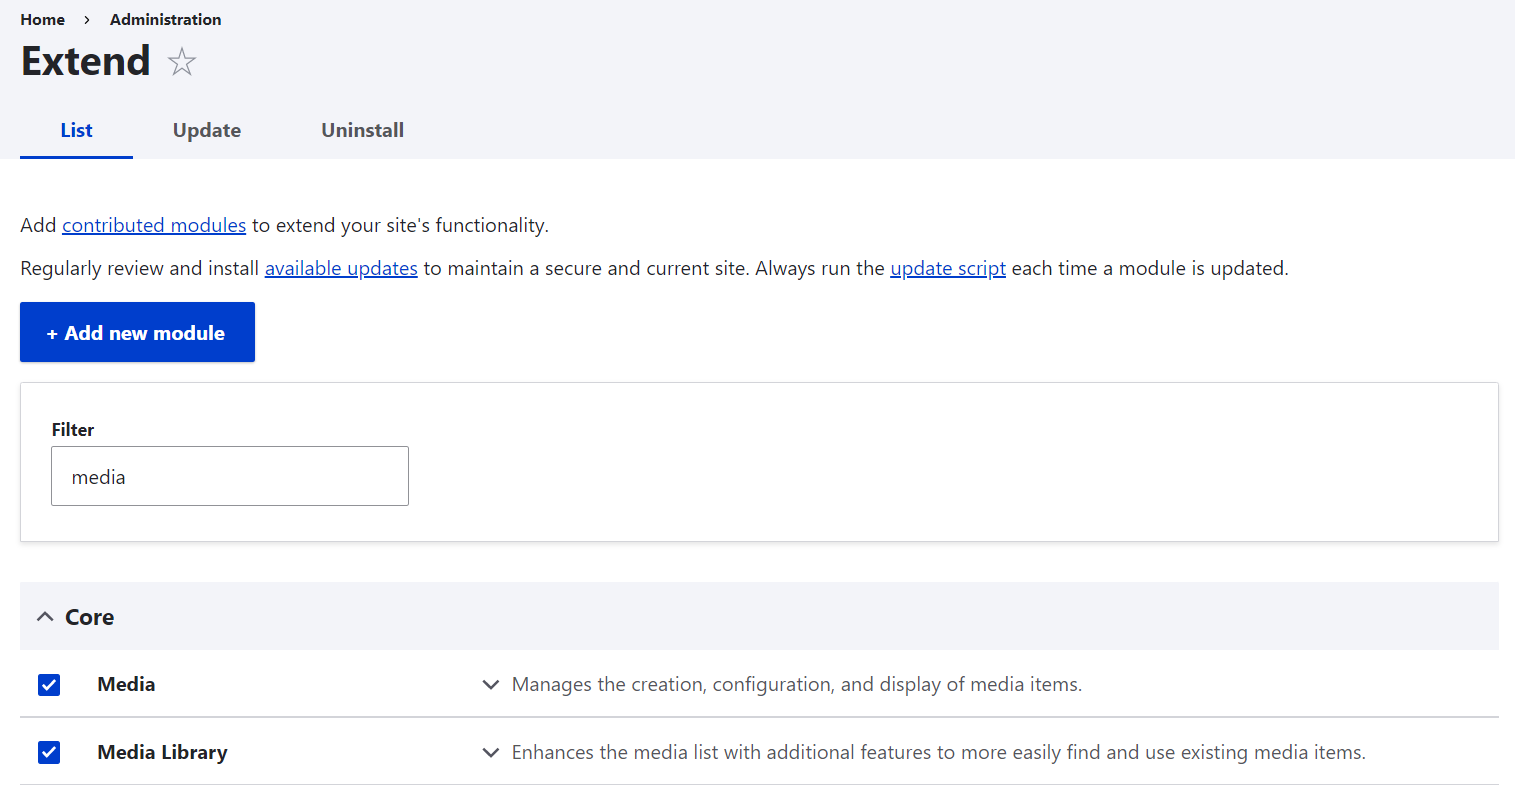
Step 1: Enabling the Media Library Module
- Media
- Media Library
- Media Types (optional but recommended)
You can enable them via the UI or Drush:
drush en media media_library
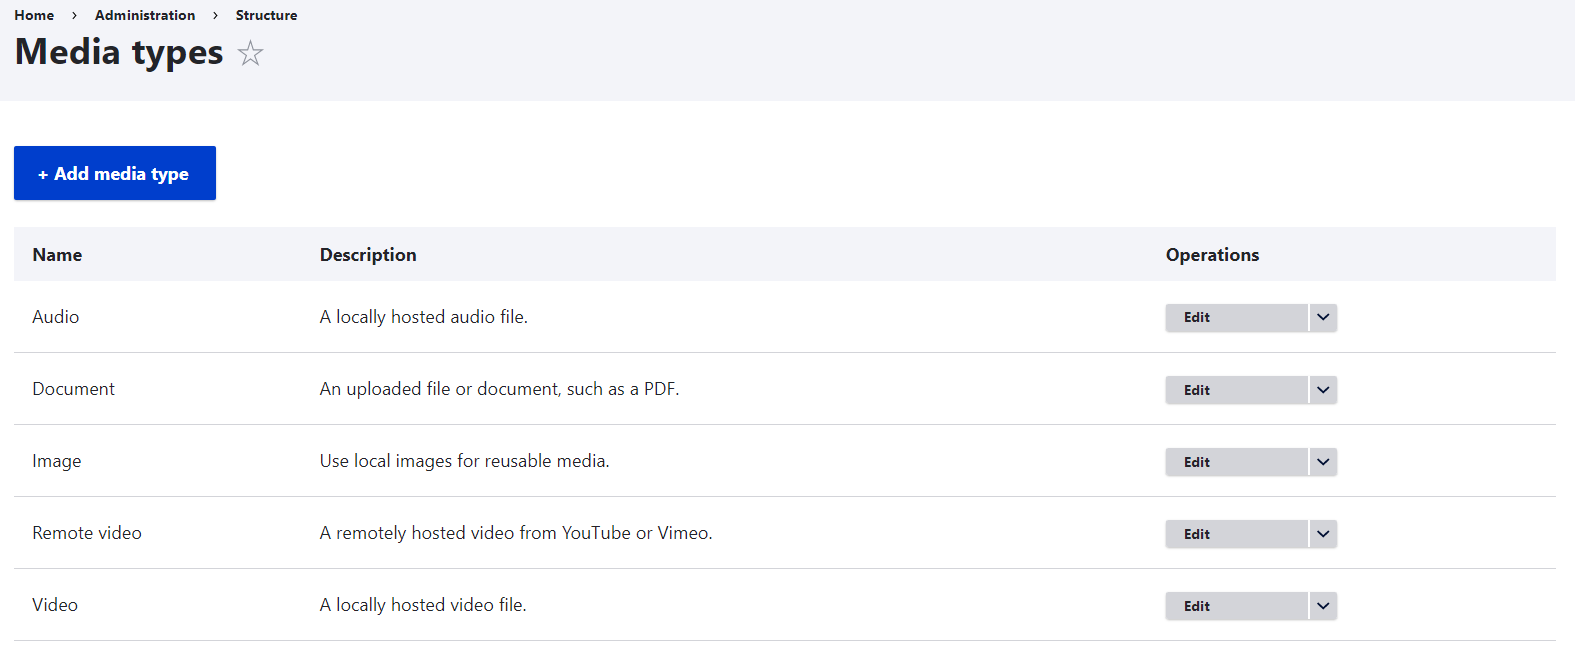
Step 2: Understanding Drupal’s media types
If you visit the Structure page, you will see 5 media types provided by Drupal out of the box:
- Image
- Document (for files and documents such as PDFs, etc.)
- Remote video (for remotely hosted videos on services like YouTube or Vimeo)
- Video (for local video files)
- Audio (for local audio files)
These are pre-configured and ready to go, so editors can create media entities based on them. Drupal site builders can also modify the built-in media types by adding fields or creating new ones. Media types are similar to content types except for one major difference.
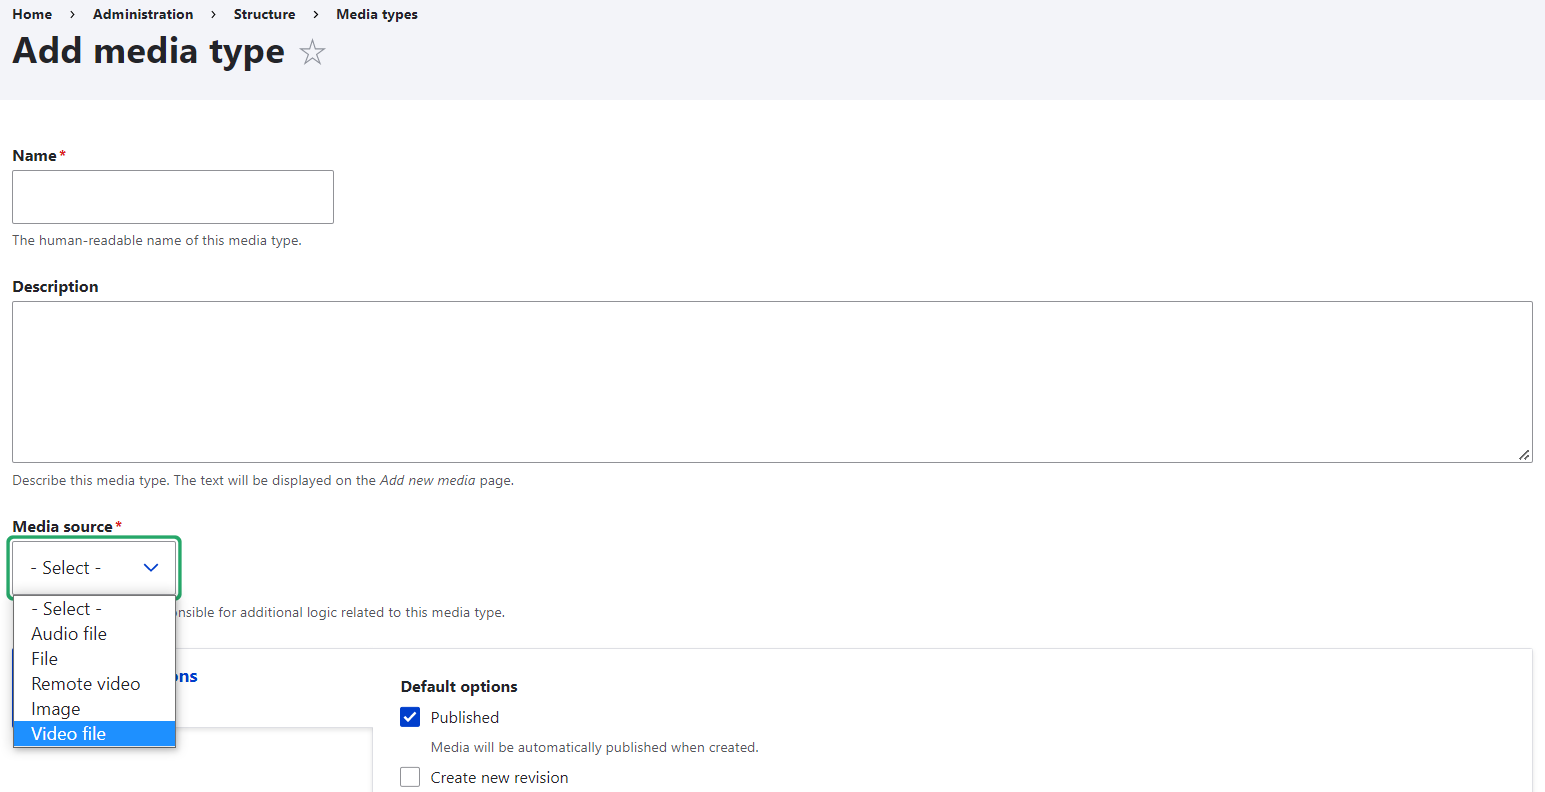
Each media type is responsible for dealing with a specific type of asset, that’s why it has specific capabilities. For example, one of the tasks the Remote Video media type is configured to do is to retrieve a video thumbnail from a third-party website. The essential knowledge is contained in the respective media source plugin that is the basis of each media type.
When creating a new media type, site builders need to select a media source for it. These can be built-in sources or additional ones provided by contributed modules like Media entity slideshow, Media entity Instagram, Media entity Twitter, or custom modules.
Step 3: Adding items to the Media Library
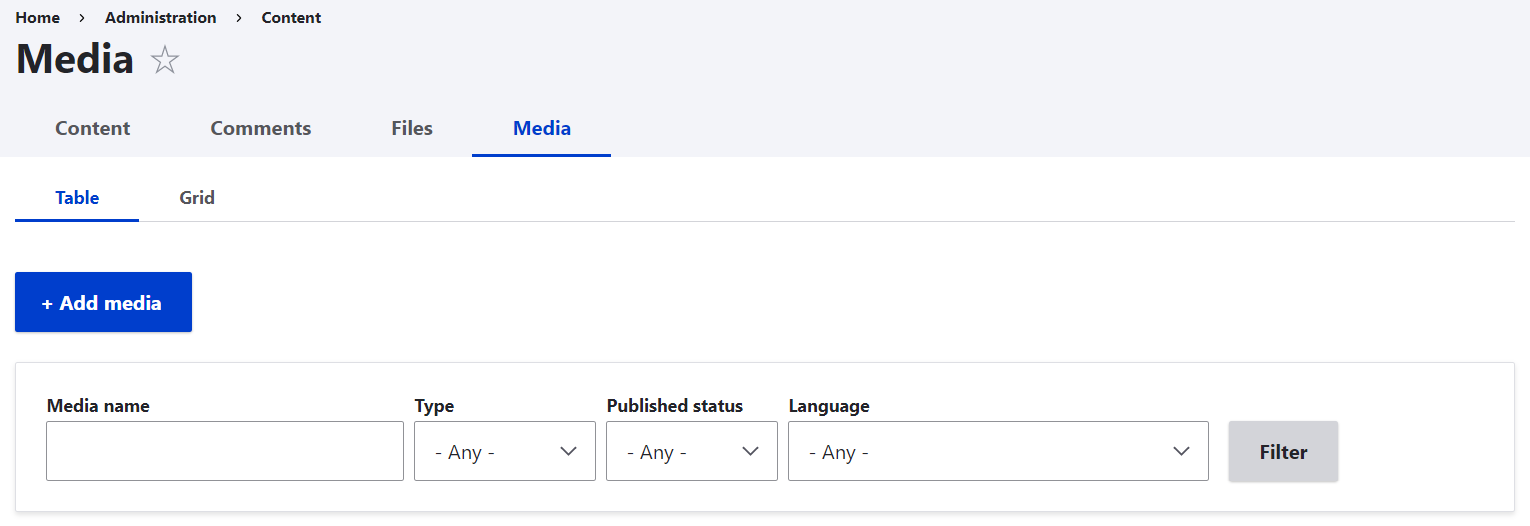
Let’s move on to the most exciting part for editors — working with the Media Library. You can find the Library on the Media tab under Content.
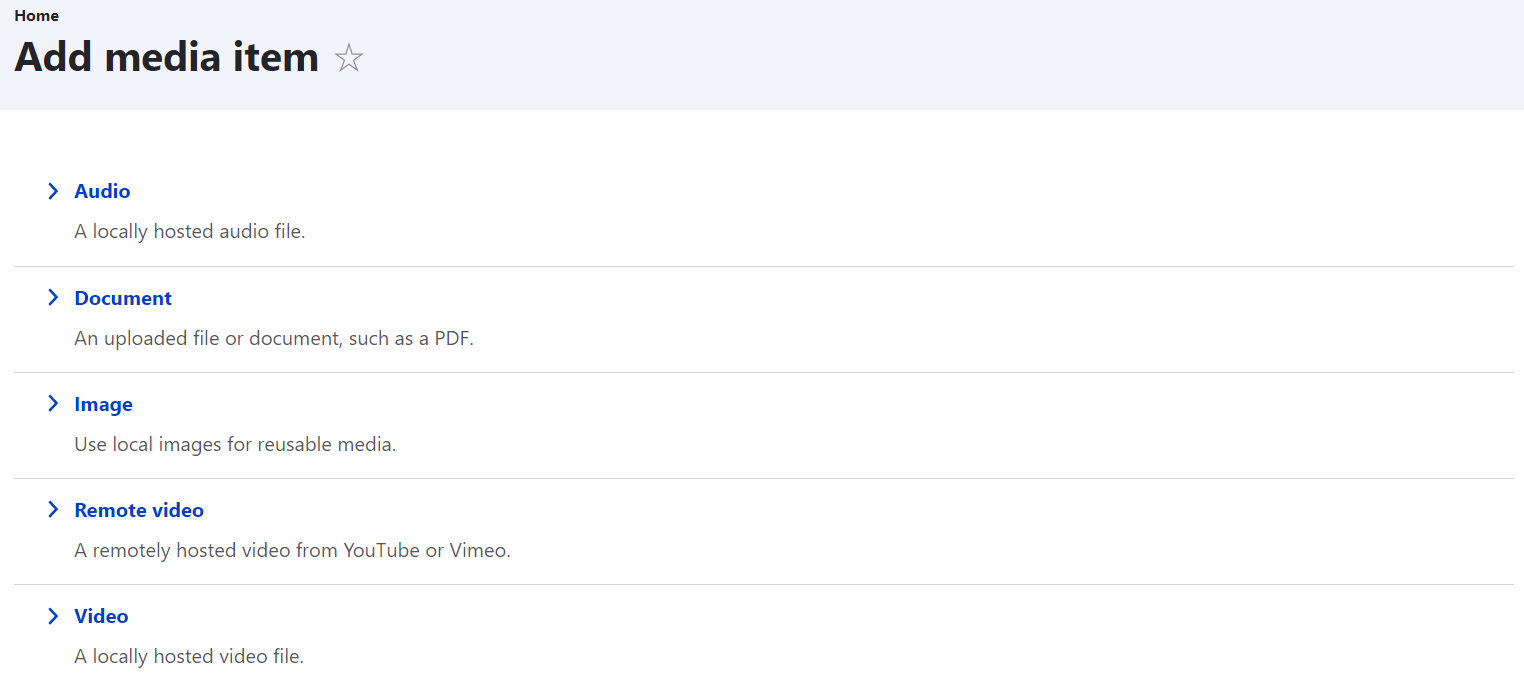
To add items to the Library, just click the “Add media” button. You will be redirected to a page where you can select which type of media you want to add (for example, an Image).
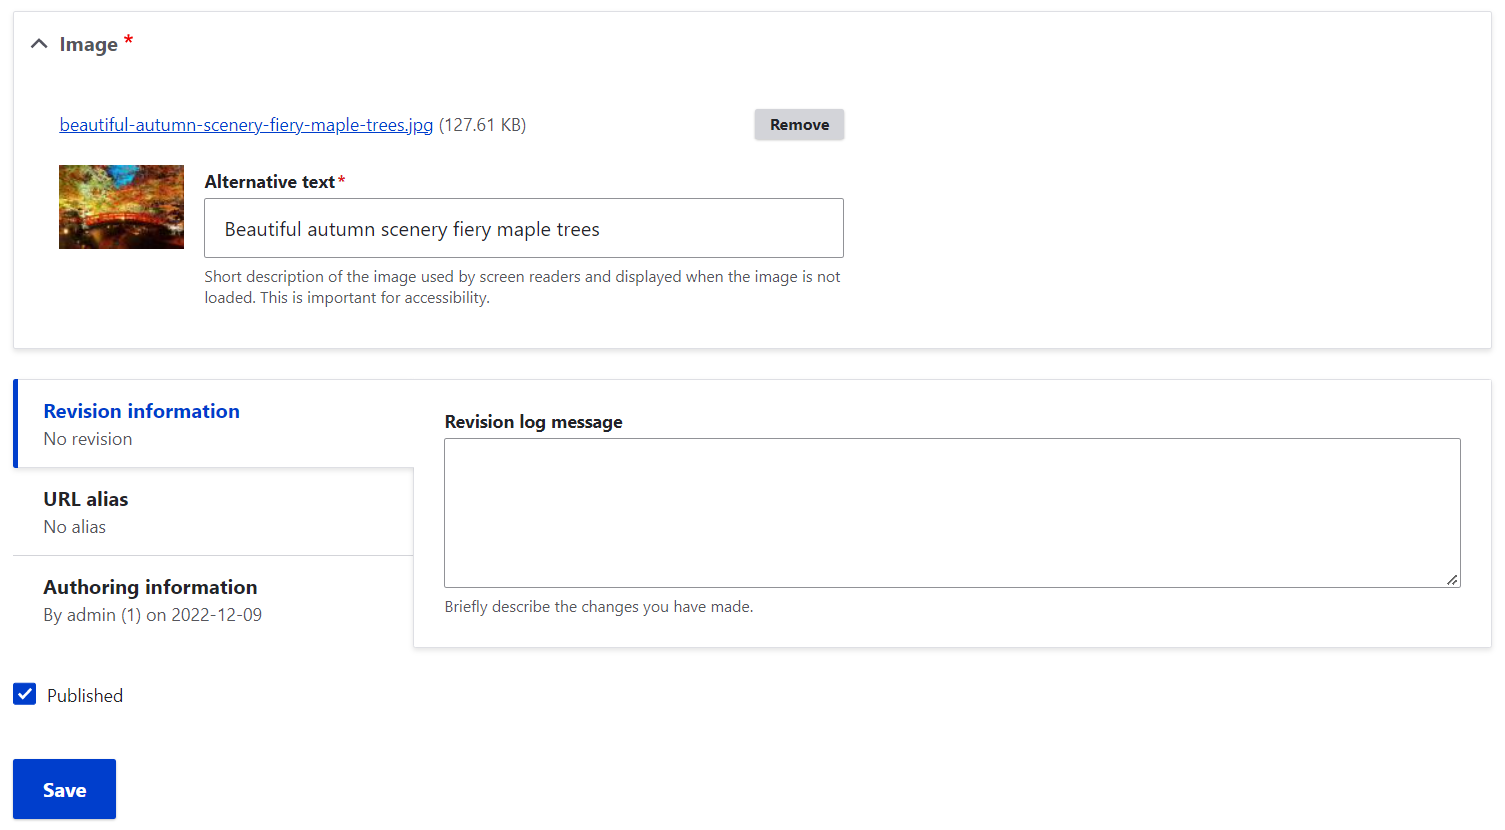
On the next step, just click the “Choose file” button and upload images from your computer.
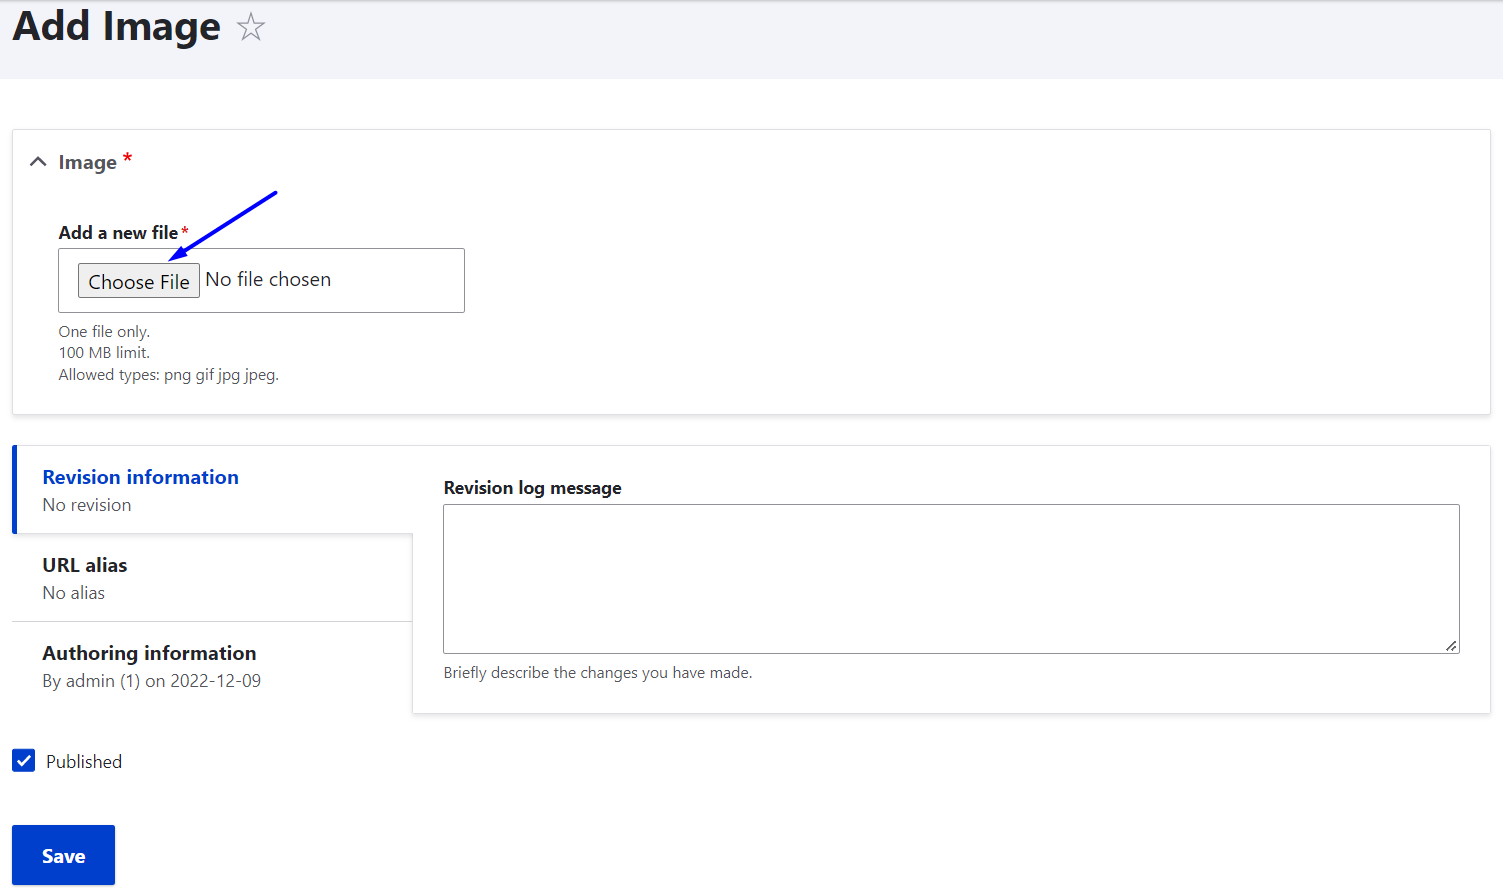
You will then be asked to fill out some information about each item you are adding. The type of information depends on the media type and its configuration. The standard Image requires you to provide an alternative text for screen readers, which is an important part of content accessibility guidelines.
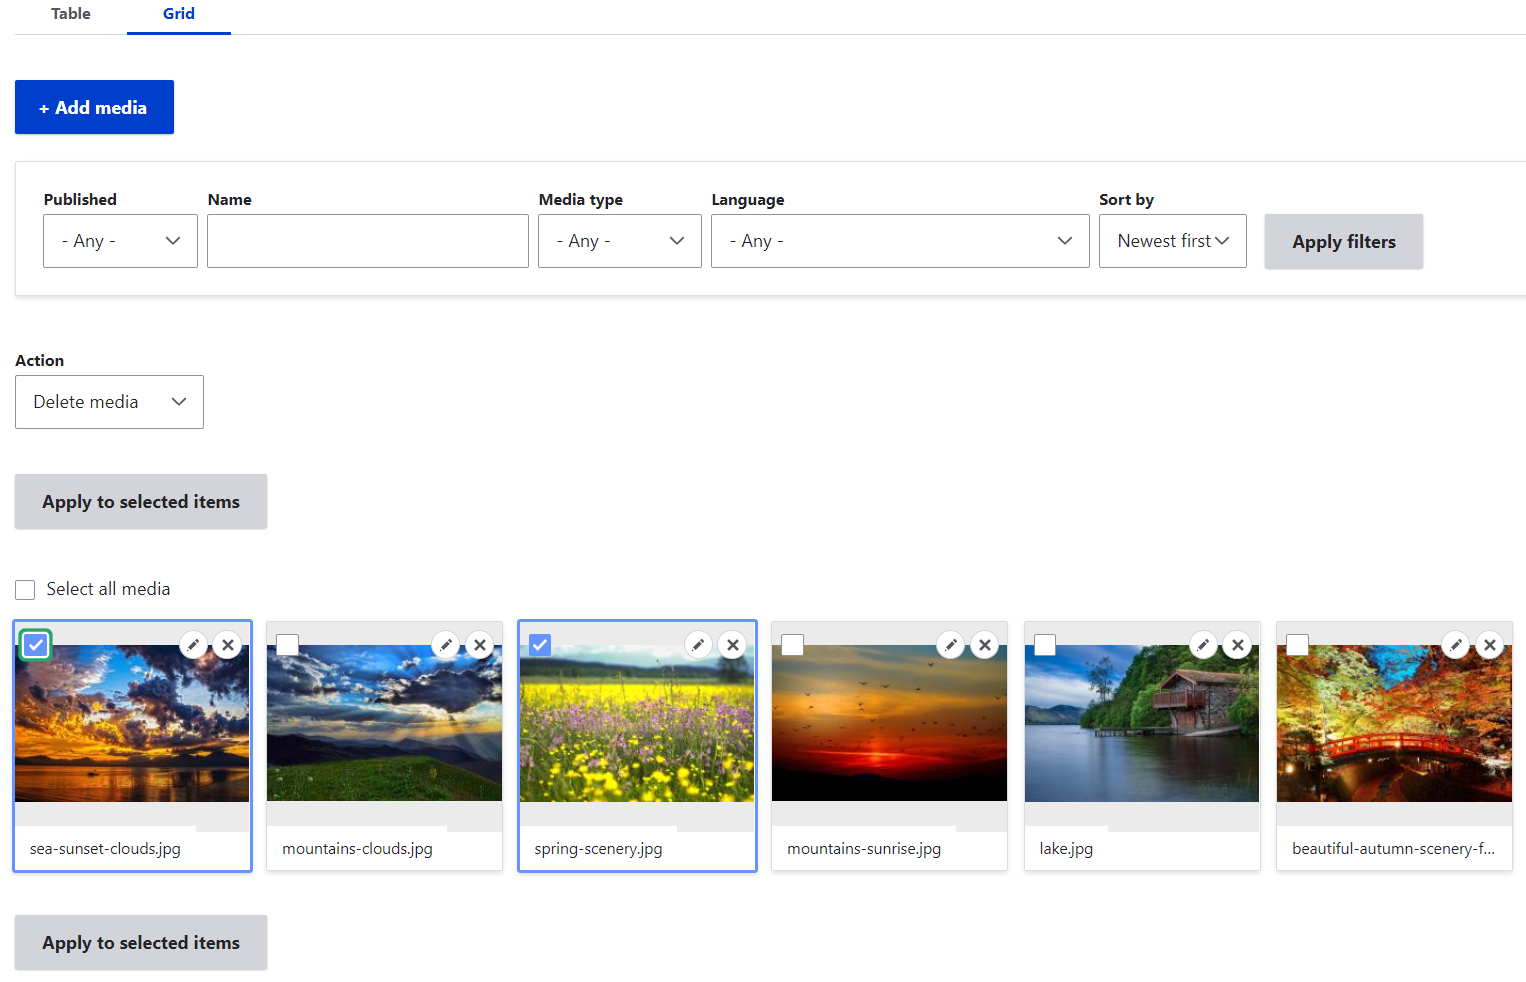
Step 4: Handling your items in the Library
- Viewing. You can view all your saved items in the Library in a table or in a grid layout. Switching between the layouts will not impact the filters or other settings you may apply.
- Finding. It’s possible to quickly find the needed items in the Library by filtering them by published status, name, media type, and language. The order in which they are displayed is defined in the “Sort by” dropdown. By default, they are sorted by “Newest first,” but you can choose to sort them by name (A-Z or Z-A).
- Editing, deleting, publishing/unpublishing. By clicking the box for an item or multiple items in the Library, you are selecting them for a specific action to be performed with them. Use the Action dropdown menu to choose if you would like to delete, publish, save, or unpublish the items and then click “Apply to selected items.”
Media embedding in the WYSIWYG text editor
1. Preparatory steps (adding the Library button to the WYSIWYG toolbar)
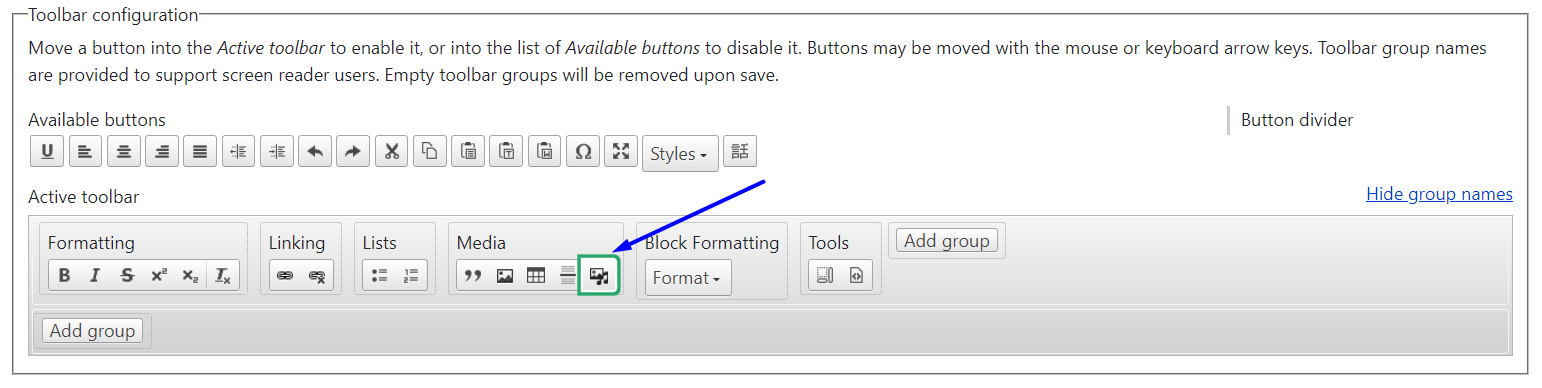
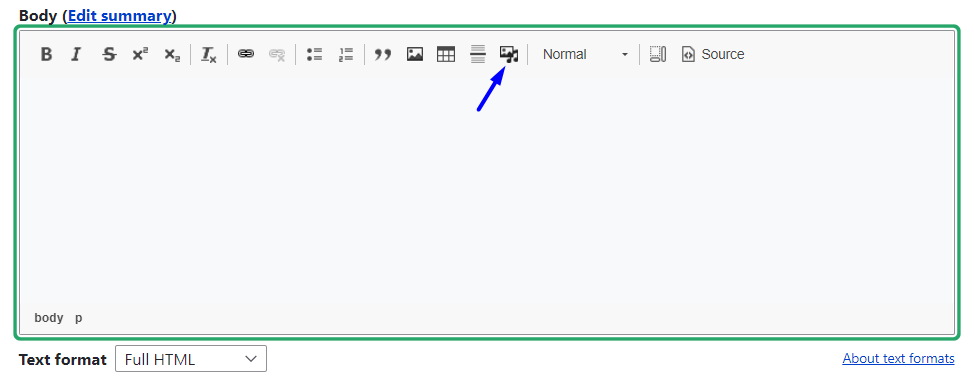
There is a button for the WYSIWYG (CKEditor) toolbar that enables you to quickly embed media assets in text. However, the button is not there out of the box. It’s necessary to add this button to the toolbar by going to Configuration > Content authoring > Text formats and editors on your Drupal admin dashboard.
Once you are there, click “Configure” for the text format you are using, scroll to the Toolbar Configuration section, and find the Library icon (it shows a photo with a musical note). Drag the button from the “Available buttons” to the “Active toolbar” and place it anywhere within the toolbar.
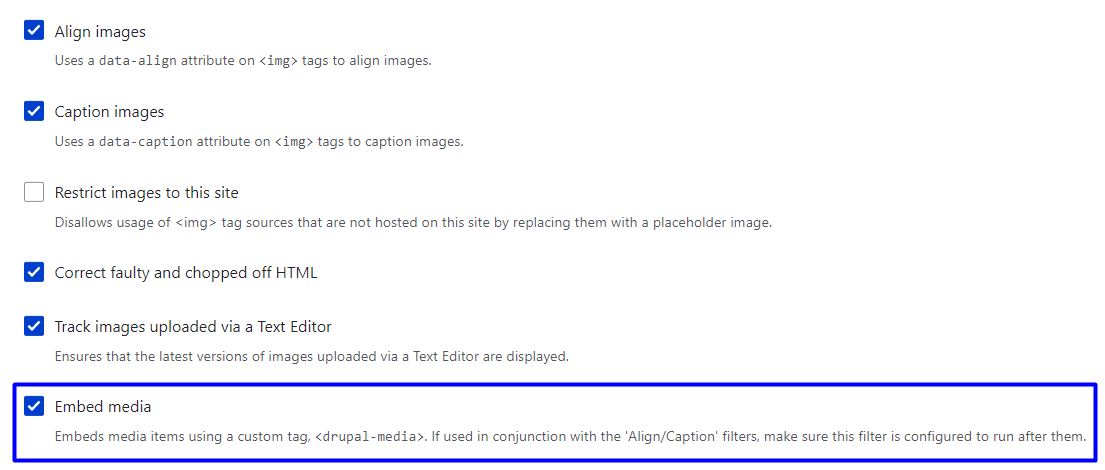
The “Embed media” filter then needs to be enabled on the same settings page. This filter must be located below all other filters such as “Align images,” “Caption images,” etc.
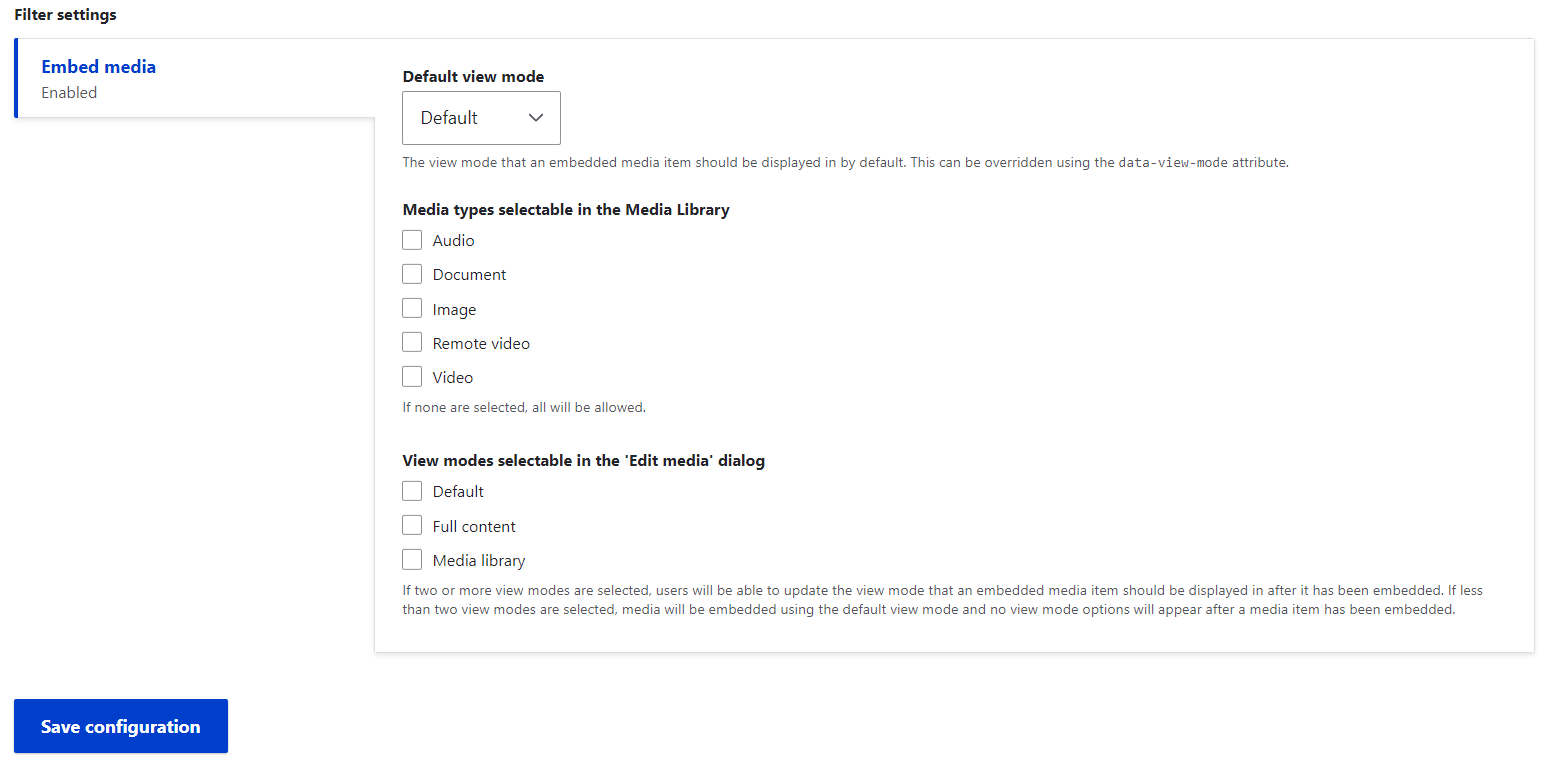
More advanced settings for the filter allow site builders to restrict which media types can be selected via WYSIWYG, as well as add “view mode” options to the “Edit media” dialog that will appear in the text editor.
2. Actual WYSIWYG embedding
Once the Media Library button is available on the WYSIWYG toolbar of the content editing form, editors can use it in their everyday content creation, and here is how.
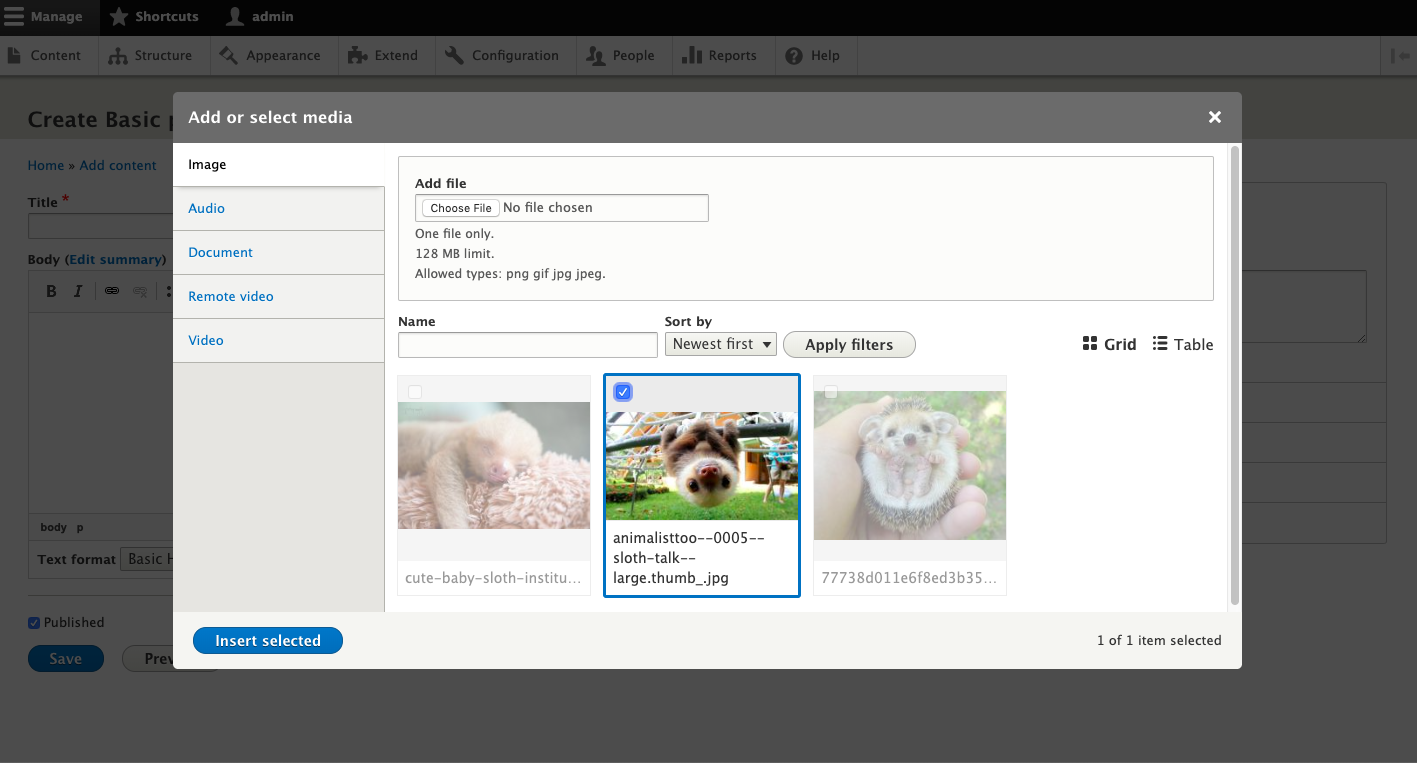
By clicking the button, you open the Library modal window where you can search for the needed assets using filters. It is still possible to upload files to the Library at this point if you need to. Once you’ve found the item that you want to select, check its box, and click “Insert selected.”
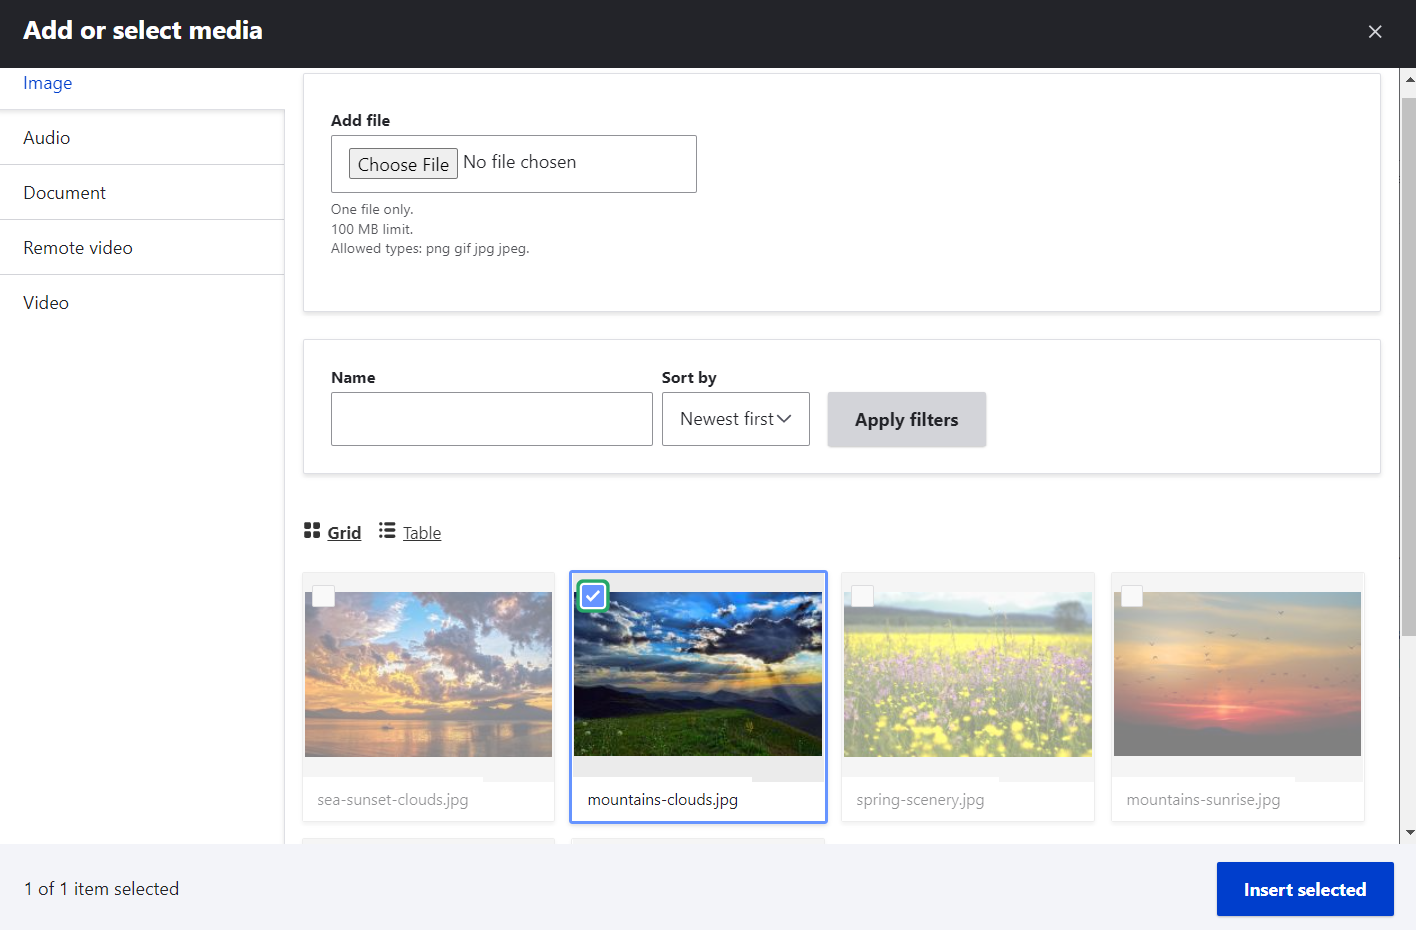
The item is immediately embedded in the text editor. In this example, there is an embedded image.

The “Edit media” button opens a dialog box that enables you to edit the alternate text, align the image, and optionally add a caption for the image.

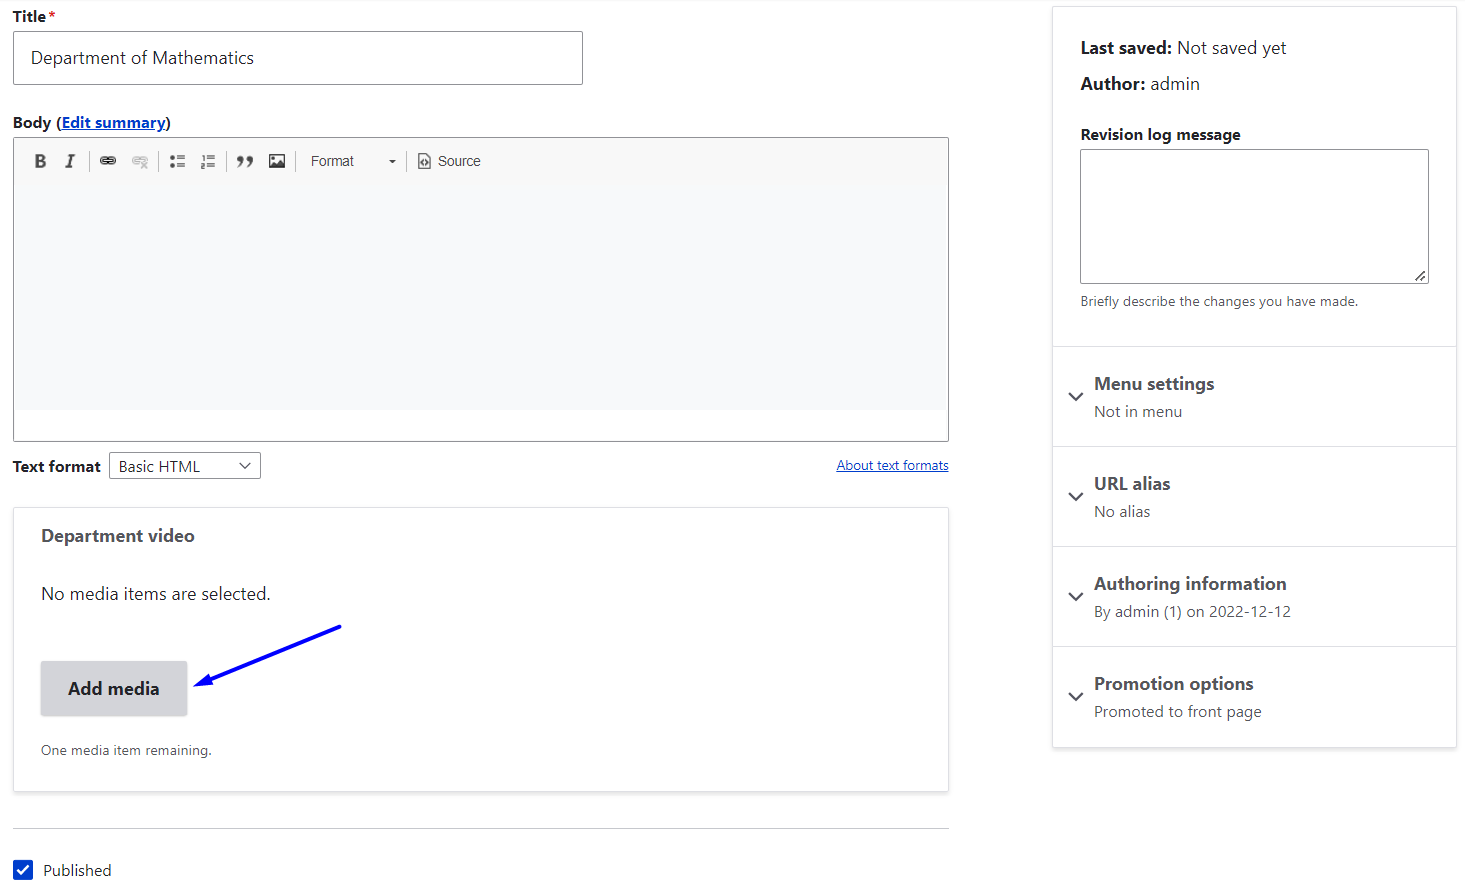
Adding the Media field to content
The next option is to add media as fields to content types or user profiles. Imagine, for example, a Department content type on a university website that structurally includes a video about the given department. This means the field for adding a video will be available on the content editing form for every department node. Editors will be able to click on this field and go directly to the Library for choosing videos.
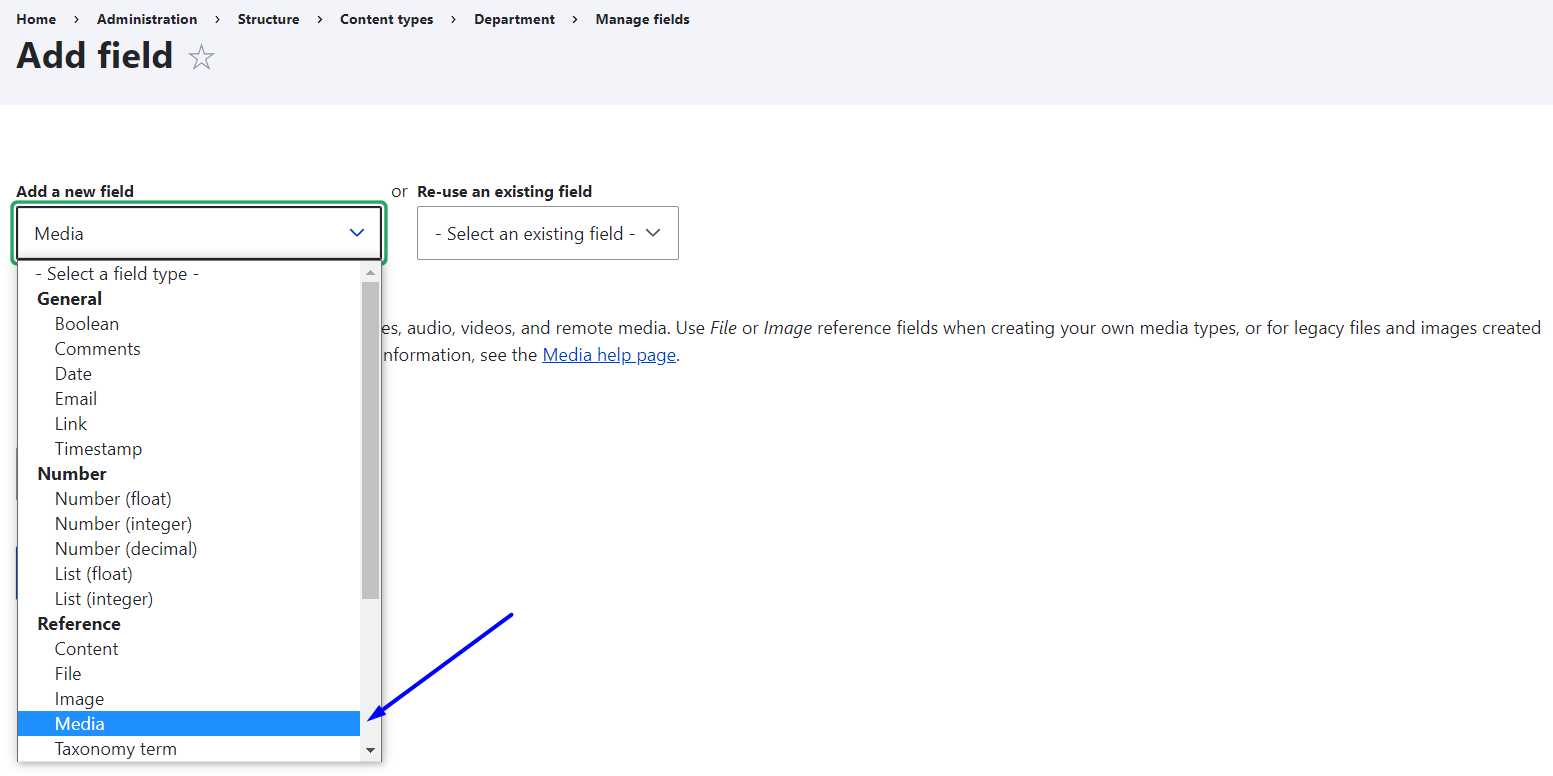
All you need to do is to go to Structure > Content types> {your content type} > Manage fields, click “Add a new field,” and select the Media field in the dropdown under “Reference.” Give it a label (e.g. “Department video”).
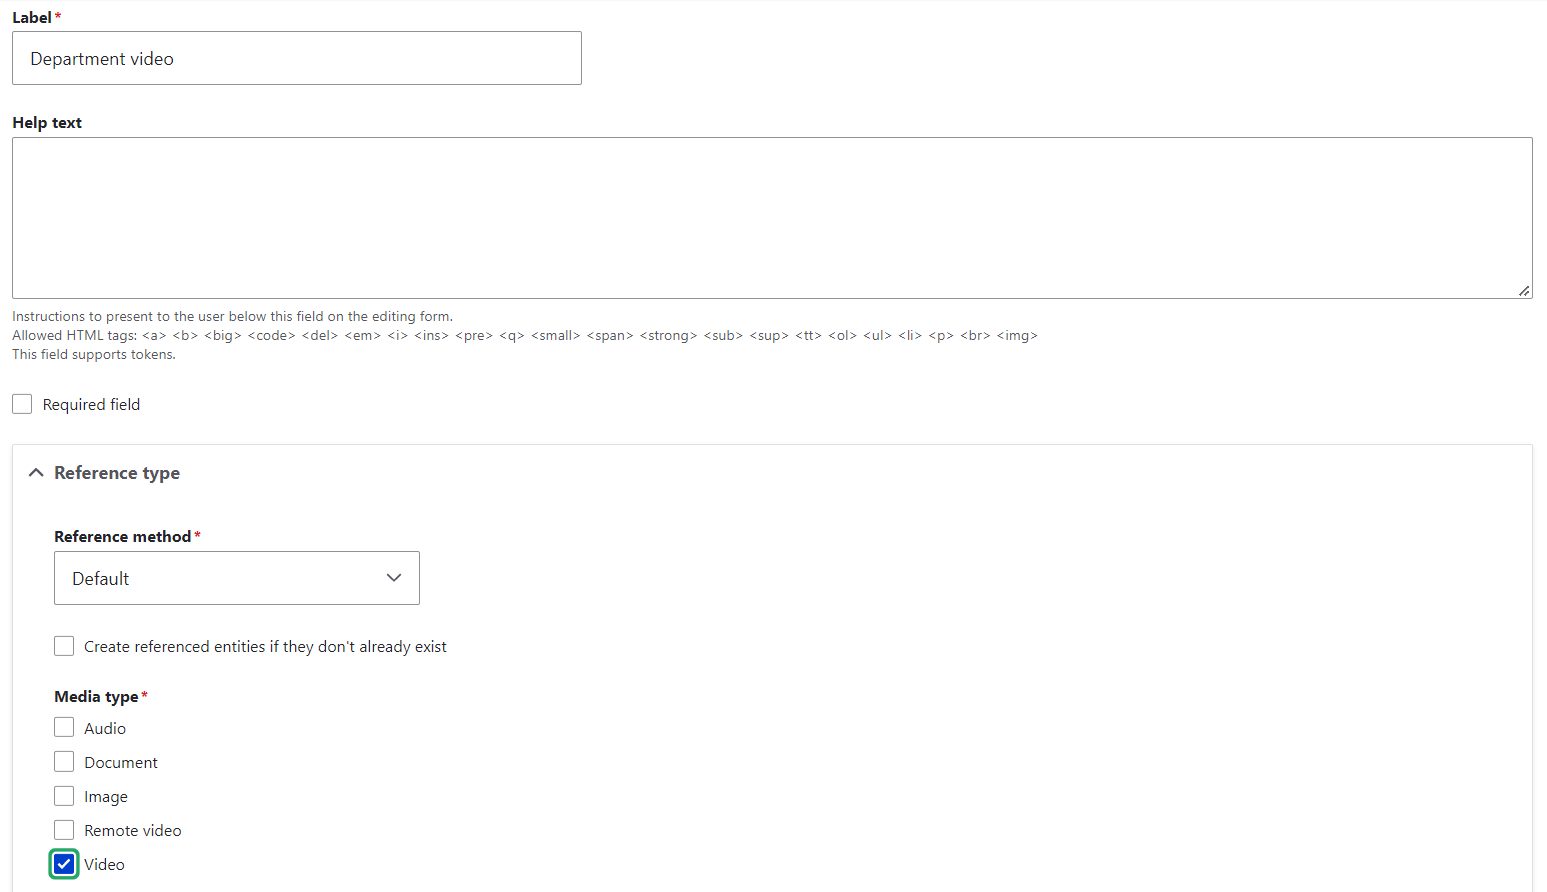
During the next step of this field setup, set the allowed number of values which defines how many videos you want to allow to be published in one node. Step 3 will offer you some important settings such as making the field required or not, and, of course, selecting the media type. In this example, we can select “Video.”
Save the settings and you are ready to go. Every node of the Department type that you want to edit or create now has a field for adding a video from the Library. To add assets from the Library, editors can follow similar simple steps to those we described earlier in the WYSIWYG embedding part.
Conclusion
The Media Library module is a must-have for modern Drupal sites. It simplifies the way you manage, reuse, and embed media assets, making life easier for editors and developers alike.
If you're building a content-heavy site or working with a team of editors, integrating the Media Library into your workflow can save you time and improve consistency.
See More Related Blog
Top Drupal SEO Modules to Boost Your Website Ranking
-
- by Mcs
We all know Drupal as this robust, flexible, and dependable CMS platform but not many realize its abilities when it comes to SEO. SEO can be one of the most influential…
Top 10 Must-Have Drupal 9 Modules for Every Project in 2025
-
- by Mcs
We get it. You want every single one of the amazing features you’ve heard about with Drupal 9. When you’re talking about features, you’re talking about modules. And…

How to Stop Spam in Drupal 8 Using CAPTCHA and reCAPTCHA
-
- by Mcs
The reCAPTCHA module in Drupal integrates the reCAPTCHA service from Google to help protect Drupal websites from spam and abuse by verifying if a user is human. It adds…
Drupal 7 vs Drupal 8
-
- by Mcs
If you’ve been running a site on Drupal 7 for a while, you’ve likely heard the buzz about Drupal 8—and maybe you’re wondering whether it’s worth the upgrade. In this…
what is composer in drupal?
-
- by Mcs
In Drupal, Composer is a dependency management tool used to manage PHP packages and libraries, including Drupal core, modules, themes, and external libraries.
Drupal Paragraphs Module: Complete Beginner’s Guide (2025)
-
- by Mcs
Paragraphs is a new way of content creation. It allows the site builders to make things cleaner and can give more editing power to the end-users.

How to Configure SMTP in Drupal (Step-by-Step Guide)
-
- by Mcs
To configure SMTP (Simple Mail Transfer Protocol) in Drupal, you'll typically use a module to route outgoing emails through an external mail server like Gmail,…
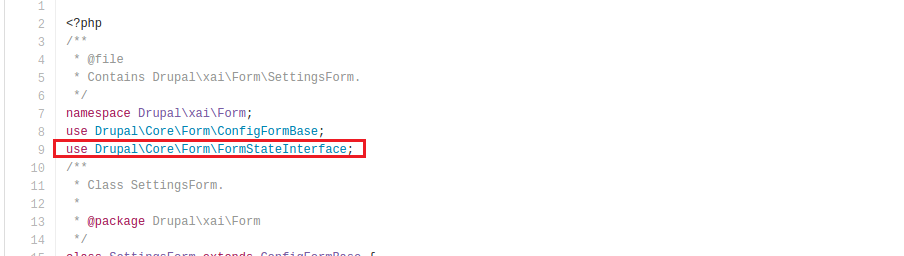
difference between use and namespace in drupal
-
- by Mcs
In Drupal, namespaces organize classes into logical groupings to avoid naming conflicts, while the use keyword provides aliases for those namespaces, allowing for…

What is FormBase in Drupal?
-
- by Mcs
In Drupal, FormBase is an abstract base class provided by the Drupal Form API. It serves as a starting point for building custom forms.
What is FormStateInterface in Drupal?
-
- by Mcs
In Drupal, FormStateInterface is a vital interface that provides access to the current state of a form, allowing developers to interact with form data, errors, and other…
How to Create a Custom Block in Drupal
-
- by Mcs
A custom block is a reusable content container that you define in code. It lets you display custom messages, HTML, or dynamic content in regions (like sidebars or…
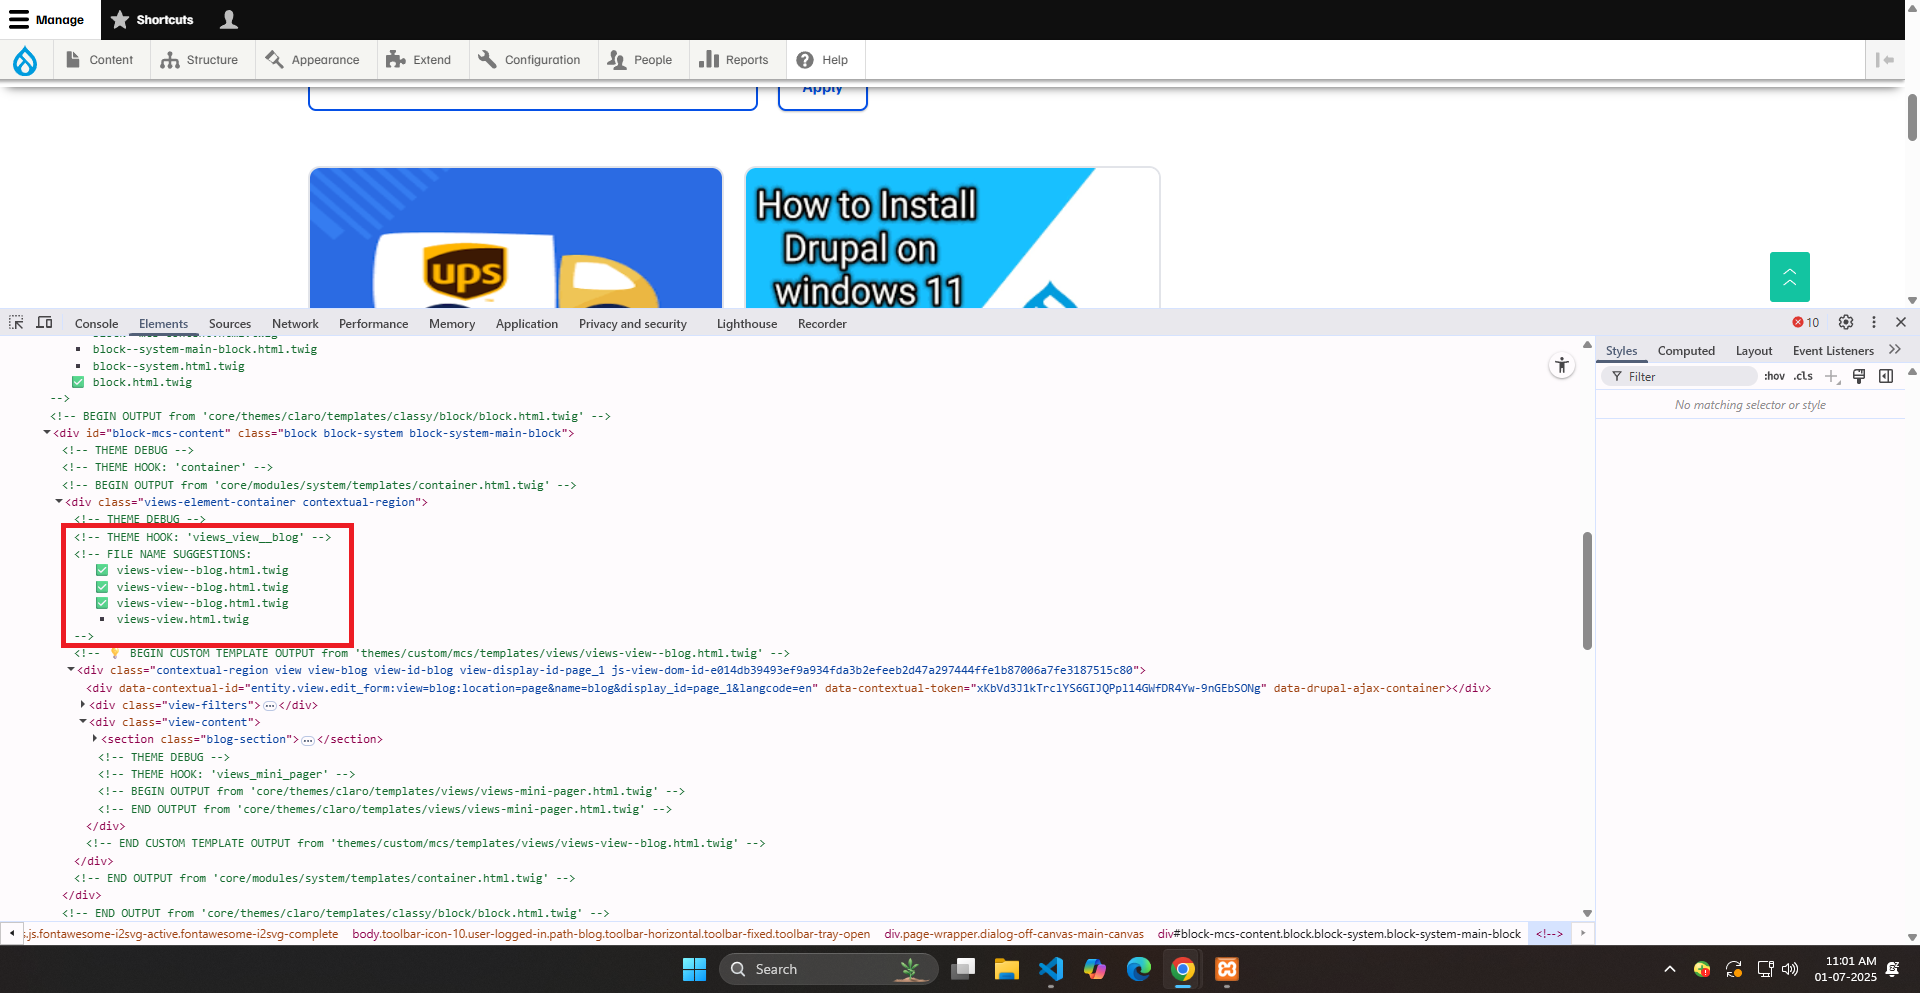
Drupal Custom Theme Suggestions for Views Explained (With Code Example)
-
- by Mcs
In Drupal, Views are a powerful way to display dynamic content, but sometimes the default theming just isn’t enough. If you need more control over how each view or…
What is Drush?
-
- by Mcs
Drush, short for Drupal Shell, is a command-line utility and scripting interface for Drupal. It allows users to interact with and manage Drupal websites from the…
How to Create a Custom Module in Drupal
-
- by Mcs
Creating a custom module in Drupal is essential when you need functionality that is not available through core or contributed modules. Here's a breakdown of why and…
diffrence between wordpress and drupal
-
- by Mcs
Drupal and WordPress are both popular open-source content management systems (CMS), but they differ significantly in their target audience and complexity

How to Create Custom Form in Drupal
-
- by Mcs
As you know, forms are a crucial part of every website because they allow users to interact with them by submitting data. Using Drupal's Form API, developers can…
The Drupal 9 Webform Module
-
- by Mcs
The Webform module is a powerful and flexible Open Source form builder and submission manager for Drupal 9. The Webform module for Drupal provides all the features…
How to Create a Custom Drupal 9 Theme
-
- by Mcs
Drupal gives developers and site owners the flexibility of creating bespoke components that can be put together to build compelling digital experiences. Themes are…

How to Install Drupal on Ubuntu
-
- by Mcs
Drupal is a free and open-source content management framework (CMF) and content management system (CMS) written in PHP. It is known for its flexibility, scalability, and…

How To Install Drupal In Windows
-
- by Mcs
Drupal is a powerful tool for creating and managing online content. As a popular open-source content management system (CMS), it offers a flexible and scalable solution…
We specialize in creating bespoke Drupal websites that are both functional and visually stunning. Our team experienced developers, designers, and strategists works collaboratively to ensure every project meets our high standards of quality and performance.


![]()


@ Mcs. All rights reserved
Comments
Add new comment