How to Import MySQL Database
-

- by Mcs June 30, 2025
Importing MySQL Database Using mysqldump
Importing a database requires the local MySQL installation to have at least one database set up. If you are starting from scratch, set up a blank database by following the steps below:
1. Launch the MySQL shell:
mysql –u root –p
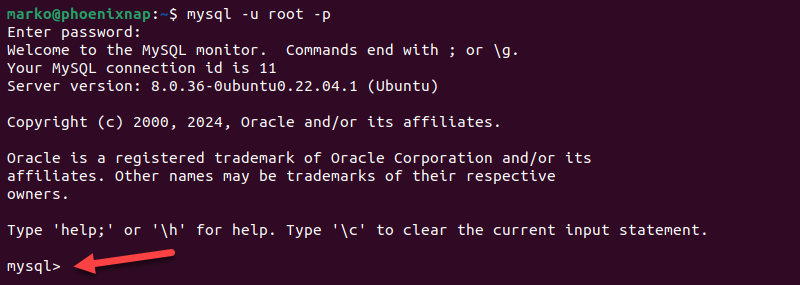
On Windows, use the following command to launch MySQL:
[path-to-mysql-binary]\mysql –u root –p
2. Enter the root password when prompted. The mysql command prompt appears.
Create a new database by entering the command below. Replace [database] with a database name.
CREATE DATABASE [database];

The system returns the Query OK message.
4. Exit the MySQL shell by pressing Ctrl-D or typing exit.
With a database set up, proceed with the following steps to import the dump file:
1. Type the command below, replacing [database] with the name of the database you want to use and [dump-file] with the file containing a database backup:
mysql –u root –p [database] < [dump-file].sql
On Windows, type the full path to the mysql.exe program. For example:
C:\tools\mysql\current\bin\mysql –u root –p [database] < [dump-file].sql
A successful import does not produce an output.
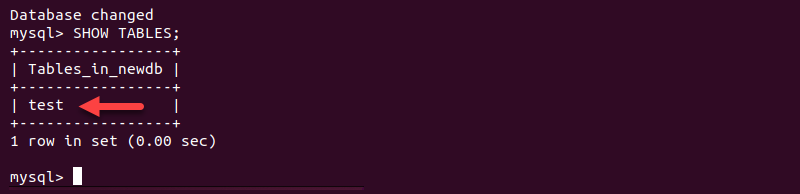
2. To check the database, log back into the MySQL shell and load the database by entering:
USE [database]
Replace [database] with the database that received the imported data.

3. Display the contents of the database by typing:
SHOW TABLES;
Check if the tables from the imported database are present in the system.
Importing MySQL Database With phpMyAdmin
Follow the steps below to import a dump file into the new database using the phpMyAdmin web interface:
1. Log into cPanel.
2. In the Databases section, select phpMyAdmin.
3. In the left column, select the database to import to.
4. Click the Import tab in the tab bar.
5. In the File to Import section, select Browse and provide the location of the dump file.
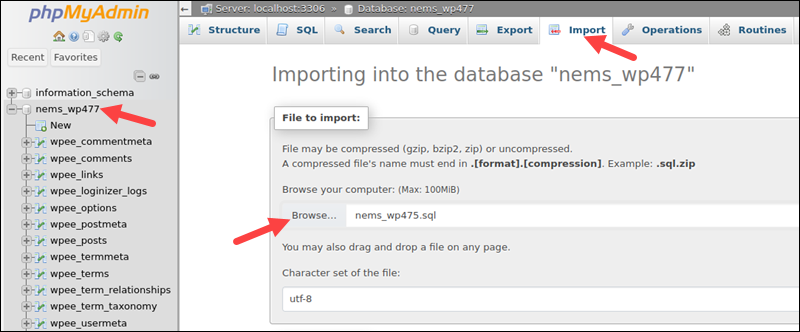
6. Set the import format to SQL.
7. Select Import.
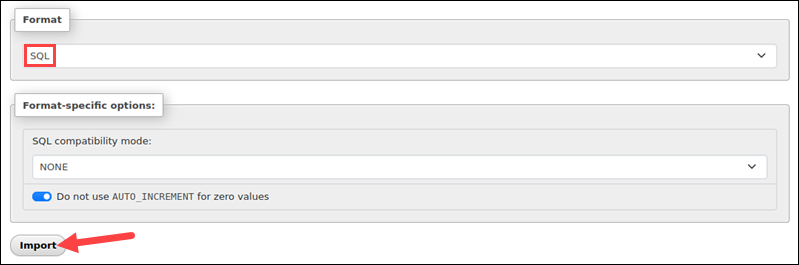
phpMyAdmin reads the file and imports its contents.
Importing MySQL Database via MySQL Workbench
MySQL Workbench features flexible import options, allowing for selective imports, various formats, encodings, etc. The following procedure shows how to import an SQL file into a MySQL database using MySQL Workbench.
1. Select the Server item from the menu bar.
2. Choose Data Import from the menu that appears.
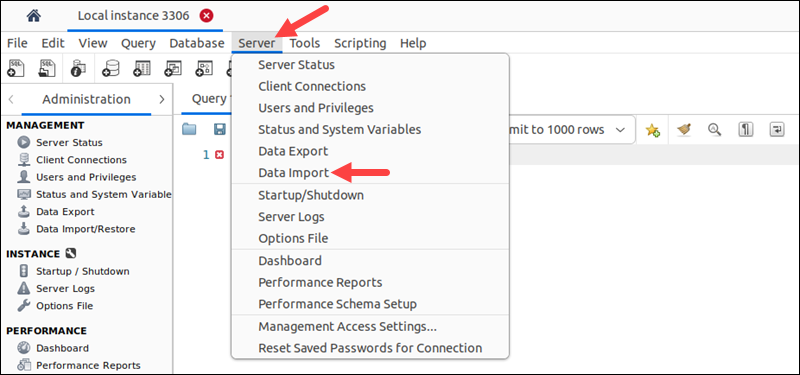
The Data Import window opens.
3. Select Import from Self-Contained File in the Import Options section. Provide the path to the dump file.
4. Choose an existing database for the Default Target Schema. To create a new database, select the New button.
5. Select Start Import.
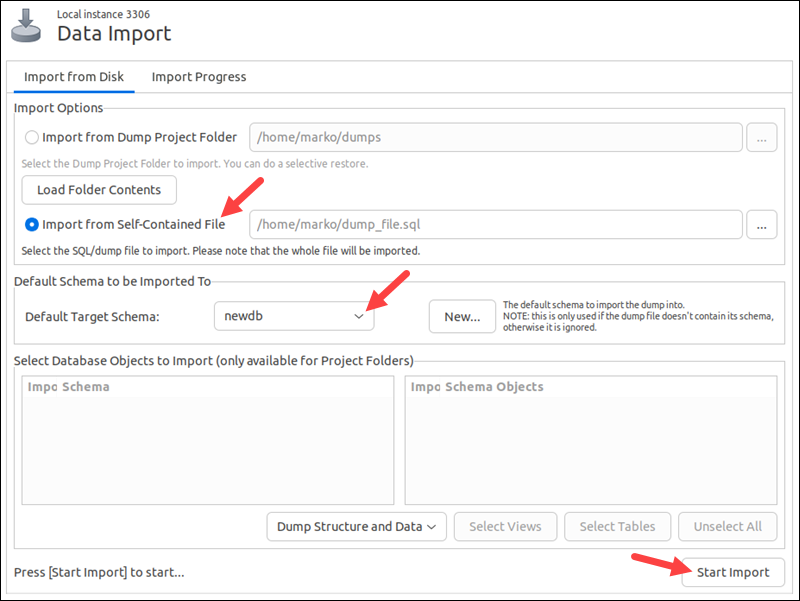
MySQL imports the contents of the dump file to the default target schema.
Conclusion
After reading this guide, you should know how to export and import a MySQL database. The methods included using the command line, server management web UI, and a graphical utility.
See More Related Blog

Fix MySQL Error 1273: Unknown Collation 'utf8mb4_0900_ai_ci' – Using PowerShell to Patch .SQL Files
-
- by Mcs
This typically happens when importing a .sql dump from MySQL 8.0+ into an older MySQL version like 5.7 or 5.6. The culprit? The newer collation utf8mb4_0900_ai_ci, which…
How to Export MySQL Database in Window and Linux
-
- by Mcs
MySQL provides multiple ways to export database content, including the CLI, web UI, and GUI methods. The following sections provide tutorials for exporting MySQL…
We specialize in creating bespoke Drupal websites that are both functional and visually stunning. Our team experienced developers, designers, and strategists works collaboratively to ensure every project meets our high standards of quality and performance.


![]()


@ Mcs. All rights reserved
Comments
Add new comment